|
|
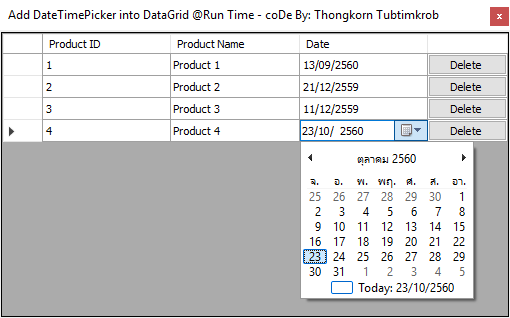
ว่ากันไปแล้วถึง 2 ภาคคือ [VB6] การนำ ComboBox Control ไปใส่ไว้ในตารางกริด MSFlexGrid แบบ Run Time และ [VB.NET] การนำ ComboBox Control ไปใส่ไว้ในตารางกริด DataGridView แบบ Run Time จะเห็นได้ว่ากรณีของ ComboBox ในตารางกริด (DataGridView) ของ VB.NET มันมีกลวิธี (Method) ในการสร้างจากตัวของตารางกริดอยู่แล้ว นั่นก็เลยไม่มีปัญหา แต่ทว่าหากเราจะนำเอา DateTimePicker มาใส่ไว้ในเซลล์ของตารางกริดนี่ซิ จะทำได้อย่างไร??? ... สำหรับ DateTimePicker มันไม่มี Method ที่จะให้เราเอาตัวมันไปใส่ไว้ในตารางกริดโดยตรงได้ เราก็แก้ปัญหาด้วยการนำแนวคิดของ VB6 มาผสมกับ VB.NET นั่นคือ ... สร้าง DateTimePicker ขึ้นมาแบบ @Run Time แล้วทำการเคลื่อนย้ายมันไปปิดทับเซลล์ที่เราต้องการนั่นเอง ... หมูน้อยร้องแมวเหมียวเลยมั้ยล่ะครับทั่นผู้ชม
หลักการคิด
- เมื่อเมาส์เคลื่อนที่ไปยังหลักที่ 3 ให้เคลื่อนที่ DateTimePicker (ขอเรียกสั้นๆว่า DTP) ไปทับลงบนเซลล์นั้น และเปิดการมองเห็น (Visible = True)
- เกิดการคัดลอกข้อมูลจากเซลล์ไปยัง DTP เราก็จะเห็นค่าวันที่ในเซลล์ไปปรากฏอยู่ใน DTP
- หากมีการเลือกค่าวันที่ใน DTP ใหม่ มันก็จะคัดลอกข้อมูลจาก DTP เอาไปเก็บไว้ในเซลล์อีกครั้งด้วย
- หากเมาส์ไปโฟกัส Control ตัวอื่นๆ ก็ปิดการแสดงผล DTP (Visible = False) เราก็เห็นค่าในเซลล์นั้นตรงกับค่าวันที่ๆเราเลือกเอาไว้
- จบบริบูรณ์
- '// ประกาศตัวแปร Object ของ DateTimePicker
- Dim oDTP As New DateTimePicker
- '// Declare columns type.
- Dim Column1 As New DataGridViewTextBoxColumn()
- Dim Column2 As New DataGridViewTextBoxColumn()
- Dim Column3 As New DataGridViewTextBoxColumn()
- '// Add new Columns
- DataGridView1.Columns.AddRange(New DataGridViewColumn() { _
- Column1, Column2, Column3 _
- })
- With DataGridView1
- .Columns(0).Name = "Product ID"
- .Columns(1).Name = "Product Name"
- .Columns(2).Name = "Date"
- End With
- '// Add 4th column (Index = 3), It's Button.
- Dim btn As New DataGridViewButtonColumn()
- DataGridView1.Columns.Add(btn)
- With btn
- .HeaderText = ""
- .Text = "Delete"
- .Name = "btnDelRow"
- .UseColumnTextForButtonValue = True
- .Width = 80
- End With
- Private Sub DataGridView1_CellClick(ByVal sender As System.Object, ByVal e As System.Windows.Forms.DataGridViewCellEventArgs) Handles DataGridView1.CellClick
- Select Case e.ColumnIndex
- '// DateTimePicker
- Case 2
- '//Adding DateTimePicker control into DataGridView
- DataGridView1.Controls.Add(oDTP)
- '// Setting the format (i.e. 02/07/2017 - dd/mm/yyyy)
- oDTP.Format = DateTimePickerFormat.Short
- '// It returns the retangular area that represents the Display area for a cell
- Dim oRectangle = DataGridView1.GetCellDisplayRectangle(e.ColumnIndex, e.RowIndex, True)
- '//Setting area for DateTimePicker Control
- oDTP.Size = New Size(oRectangle.Width, oRectangle.Height)
- '// Setting Location
- oDTP.Location = New Point(oRectangle.X, oRectangle.Y)
- '// Read value from DataGridView into DateTimePicker
- oDTP.Value = DataGridView1.CurrentCell.Value
- '// Now make it visible
- oDTP.Visible = True
- '// Force to change date value at oDTP_ValueChanged Event.
- AddHandler oDTP.ValueChanged, AddressOf oDTP_ValueChanged
- '// Delete Button
- Case 3
- 'MsgBox(("Row : " + e.RowIndex.ToString & " Col : ") + e.ColumnIndex.ToString)
- Dim colName As String = DataGridView1.Columns(e.ColumnIndex).Name
- If colName = "btnDelRow" Then
- '// Delete current row from DataGridView1
- DataGridView1.Rows.Remove(DataGridView1.CurrentRow)
- End If
- End Select
- End Sub
มาดูโค้ดฉบับเต็ม ...
- ' / --------------------------------------------------------------------------------
- ' / Developer : Mr.Surapon Yodsanga (Thongkorn Tubtimkrob)
- ' / eMail : thongkorn@hotmail.com
- ' / URL: http://www.g2gnet.com (Khon Kaen - Thailand)
- ' / Facebook: https://www.facebook.com/g2gnet (For Thailand)
- ' / Facebook: https://www.facebook.com/commonindy (Worldwide)
- ' / Purpose: Adding DateTimePicker and Button control into DataGridView @Runtime.
- ' / Microsoft Visual Basic .NET (2010)
- ' /
- ' / This is open source code under @CopyLeft by Thongkorn Tubtimkrob.
- ' / You can modify and/or distribute without to inform the developer.
- ' / --------------------------------------------------------------------------------
- Public Class Form1
- '// ประกาศตัวแปร Object ของ DateTimePicker
- Dim oDTP As New DateTimePicker
- Private Sub Form1_Load(sender As System.Object, e As System.EventArgs) Handles MyBase.Load
- '// Initialize DataGridView Control
- With DataGridView1
- .AllowUserToAddRows = False
- .AllowUserToDeleteRows = False
- .AutoSizeColumnsMode = DataGridViewAutoSizeColumnsMode.Fill
- .AutoResizeColumns()
- End With
- '// Declare columns type.
- Dim Column1 As New DataGridViewTextBoxColumn()
- Dim Column2 As New DataGridViewTextBoxColumn()
- Dim Column3 As New DataGridViewTextBoxColumn()
- '// Add new Columns
- DataGridView1.Columns.AddRange(New DataGridViewColumn() { _
- Column1, Column2, Column3 _
- })
- With DataGridView1
- .Columns(0).Name = "Product ID"
- .Columns(1).Name = "Product Name"
- .Columns(2).Name = "Date"
- End With
- '// Add 4th column (Index = 3), It's Button.
- Dim btn As New DataGridViewButtonColumn()
- DataGridView1.Columns.Add(btn)
- With btn
- .HeaderText = ""
- .Text = "Delete"
- .Name = "btnDelRow"
- .UseColumnTextForButtonValue = True
- .Width = 80
- End With
- '// SAMPLE DATA
- Dim RandomClass As New Random()
- '// DateTime.Today.AddDays(-RandomClass.Next(365)) --> Random past date 365 days.
- Dim row As String() = New String() {"1", "Product 1", DateTime.Today.AddDays(-RandomClass.Next(365))}
- DataGridView1.Rows.Add(row)
- row = New String() {"2", "Product 2", DateTime.Today.AddDays(-RandomClass.Next(365))}
- DataGridView1.Rows.Add(row)
- row = New String() {"3", "Product 3", DateTime.Today.AddDays(-RandomClass.Next(365))}
- DataGridView1.Rows.Add(row)
- row = New String() {"4", "Product 4", DateTime.Today.AddDays(-RandomClass.Next(365))}
- DataGridView1.Rows.Add(row)
- End Sub
- Private Sub DataGridView1_CellClick(ByVal sender As System.Object, ByVal e As System.Windows.Forms.DataGridViewCellEventArgs) Handles DataGridView1.CellClick
- Select Case e.ColumnIndex
- '// DateTimePicker
- Case 2
- '//Adding DateTimePicker control into DataGridView
- DataGridView1.Controls.Add(oDTP)
- '// Setting the format (i.e. 02/07/2017 - dd/mm/yyyy)
- oDTP.Format = DateTimePickerFormat.Short
- '// It returns the retangular area that represents the Display area for a cell
- Dim oRectangle = DataGridView1.GetCellDisplayRectangle(e.ColumnIndex, e.RowIndex, True)
- '//Setting area for DateTimePicker Control
- oDTP.Size = New Size(oRectangle.Width, oRectangle.Height)
- '// Setting Location
- oDTP.Location = New Point(oRectangle.X, oRectangle.Y)
- '// Read value from DataGridView into DateTimePicker
- oDTP.Value = DataGridView1.CurrentCell.Value
- '// Now make it visible
- oDTP.Visible = True
- '// Force to change date value at oDTP_ValueChanged Event.
- AddHandler oDTP.ValueChanged, AddressOf oDTP_ValueChanged
- '// Delete Button
- Case 3
- 'MsgBox(("Row : " + e.RowIndex.ToString & " Col : ") + e.ColumnIndex.ToString)
- Dim colName As String = DataGridView1.Columns(e.ColumnIndex).Name
- If colName = "btnDelRow" Then
- '// Delete current row from DataGridView1
- DataGridView1.Rows.Remove(DataGridView1.CurrentRow)
- End If
- End Select
- End Sub
- '// Event Handler when the change value in DateTimePicker.
- Private Sub oDTP_ValueChanged(sender As Object, e As System.EventArgs)
- '// Display date value.
- DataGridView1.CurrentCell.Value = Format(oDTP.Value, "dd/MM/yyyy")
- End Sub
- Private Sub DataGridView1_CellLeave(sender As Object, e As System.Windows.Forms.DataGridViewCellEventArgs) Handles DataGridView1.CellLeave
- '// Hidden DateTimePicker
- oDTP.Visible = False
- End Sub
- Private Sub Form1_Resize(sender As Object, e As System.EventArgs) Handles Me.Resize
- oDTP.Visible = False
- End Sub
- End Class
ดาวน์โหลดโค้ดต้นฉบับ VB.NET (2010) ได้ที่นี่
|
ขออภัย! โพสต์นี้มีไฟล์แนบหรือรูปภาพที่ไม่ได้รับอนุญาตให้คุณเข้าถึง
คุณจำเป็นต้อง ลงชื่อเข้าใช้ เพื่อดาวน์โหลดหรือดูไฟล์แนบนี้ คุณยังไม่มีบัญชีใช่ไหม? ลงทะเบียน
x
|


 โพสต์ 2017-10-23 12:30:23


 โพสต์ 2018-10-20 20:36:21
